Here are some of the main problems happens in the resinous (Epoxy / Polyurethane) flooring and coatings.
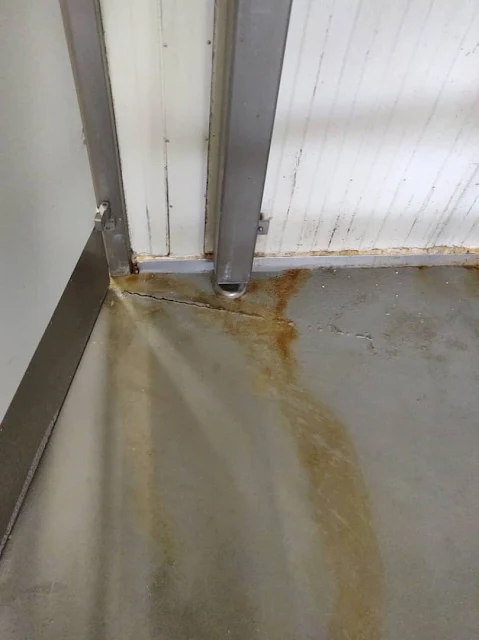
1. Yellowing effect
2. Fish Eye
3. De-bonding / Peeling off
4. Bubbling effect:
4. Bubbling effect:
5. Milky or Cloudy appearance
6. Un dissolved material
7. Orange Peel effect
8. Pinholes
9. Stains / Tire Marks
10. Material Settlement
11. Not Drying / Slow Drying / Remains talky
12. wavy flooring11. Not Drying / Slow Drying / Remains talky
13. Alligator Cracks
14. Brush / trowel / roller marks
15. Bulge / crack at joints
16. Straight cracks
17. Failure at columns, wall, joints etc.
Let us discuss in brief:
Before we start, we must have confident in the manufacturer. He may be certified from ISO 9001 or not. As we all know, the manufacturers makes the product in number of batches, test every batch for the quality and distribute it various parts. If you get any kind of problem in the product, the same must be encountered in other part also. For the shake of listing the reasons only, I have mentioned that it may be product problem. In case if you assume that it product problem, the first thing we all have do is - Contact immediately to the Manufacture's Technical Service Team with the all possible detail.
1. Yellowing effect:
Flooring / coating has developed a yellow - slight change in colour:
When these are exposed to direct / indirect sunlight / high interns lighting system, this problem may occurs. Some times, people get confused with color float issues when a pigmented epoxy has been applied or used to re-touched or rolled again after sitting for 15 minutes or longer. Different shades in the color may Coloring can vary from batch to batch.
Can be resolved by applying UV resistant coating over it. Always check to make sure that you have the same batch number on the pigmented side. Mix the components by mechanical means with the ratio as per manufacturer's specification.
Some times, the yellow staining comes from the rusted portions of MS Structures around the treated floor. Make sure anti-corrosive coating with suitable top coating has been applied.
2. Fish Eye:
They look like a crater with a rim around the perimeter and contain a small dot in the center. This is what gives it the name “fish eye”.
Oil/Grease Contaminated floor results in the fish eyes.
Remove the coating by grinding or another suitable method. Clean substrate; remove all oil/grease contamination. Re-coat the entire area. De-grease the surface properly using appropriate product. If it cannot be entirely removed, use a suitable oil-stop primer.
3. De-bonding / Peeling off:
Applied flooring / coating getting de-bonding from the surface or from first layer.
Surface contaminants / improper surface preparation: Surface was contaminated by water, humidity, oil, dust or grease. The substrate should have a surface tensile strength of at least 1.5 N/mm².
Beyond re-coat window: Coating was applied beyond the recommended time for re-coating.
Improper Mixing Methods: Coating was not mixed at proper ratio or for 3 minutes at minimum.
Improper / poor / in-correct priming.
Moisture Vapor: Water vapor rising up through the substrate can cause this de-lamination. After removing the problem areas, you may notice the concrete being dark from being damp.
Each coat needs to be applied with 24 hours. Also, it is necessary to allow the primer or scratch coat to dry completely before the subsequent application.
Check substrate carefully before applying epoxy. Remove any contamination prior to coating. Conduct the Pull-off testing to know the surface tensile strength.
Mix and apply the recommended products as per manufacturer's specification. Conduct the moisture test, make sure the moisture is less than 5% or else, apply Damp-proof coating to arrest the moisture.
4. Bubbling effect:
Small bubbles formed in the applied flooring / coating.
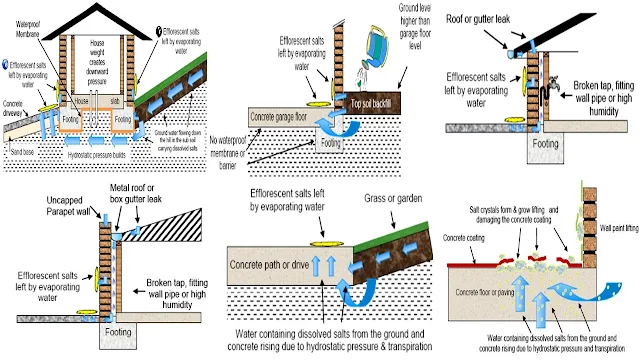
If you found some white colour powder or liquid which smell unpleasant below / beyond the de-bonded material, then this is the Moisture movement or Efflorescence effect from the capillary action to the surface by water and left when the water evaporates, hydrostatic pressure or osmosis / evaporation, etc.
Efflorescence are of 2 kinds:
Primary efflorescence – salt in concrete or clay products is dissolved or carried by
capillary action to the surface by water and left when the water evaporates. This type of
efflorescence generally occurs for about 2 to 3 years and reduces naturally as the available
salts are depleted.
Secondary efflorescence – salts in ground water or another source are carried to the
surface of concrete or brickwork by hydrostatic pressure or osmosis/evaporation (also
referred to as evapo-transpiration) and left when the water evaporates. This type of
efflorescence continues as long as the source of the salty groundwater remains available
Let see some of the Efflorescence cases where all it can emerges:
Image and details curtsy : Concrete Efflorescence Fact Sheet TFS00204-V2-0117.doc
5. Milky or Cloudy appearance:
When the material is being applied or before it’s fully cured, the Moisture in the concrete or high humidity can cause this effect. This is sometimes referred to as a “blush” or “amine blush” or "milky" or "greasy" or "cloudy" effect.
Thick application: A milky or cloudy appearance can result from product being applied too thick. It’s usually more noticeable if the coating is clear.
If the material is not mixed properly or product has expired it shelf life, this can happen.
6. Un dissolved material:
Small lumps like material in the mix, which can break in to powder / dry mix by hand. but not getting dissolved in the mix.
This general happens with the product with 2 or more components and that to in the filler component. Lumps may formed in the filler content due to moisture movement in the pack or dampness contact with the pack.
Improper mixing process may also cause this problem. Mix the product to certain time as per manufacturer's instruction. Mixing has to be carried out using heavy duty speed controllable drilling machine mixed with mixing paddle.
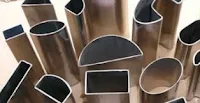
There are different kinds of mixing paddle are available in the market. By doing trails, manufacturer can also design the mixing paddle. In general, use Pear mixing paddle for cementitious products, use Spiral mixing paddle for resin based product and Butterfly mixing paddle for the resin product containing fibers in it. You can use 2-3 paddle if tin case of mixing 2-3 packs at a time.
7. Orange Peel effect:
A stipple appear on the dried surface, not able to achieve the smooth even looking surface. material get scatter.
Orange peel is caused by incorrect coating techniques, improper setup of spray painting equipment (incorrect nozzle or air pressure), thinner or hardener evaporate too quickly, or too little or excessive use of paint or coating. So, follow the instruction of manufacturer.
In flooring and floor coatings where the product is designed for the thicker application: In cold substrate, product will be prevented from leveling out causing an “orange peel” appearance and in hot substrate, product starts to cure too rapidly which prevents the product from leveling out. The product should not be applied in temperatures less than 10°C or where the ambient relative humidity is greater than 85%.
If thinning is required, talk to manufacturers to use up to 5% Acetone mixed within the coating.
8. Pinholes :
Pinholes in the coating appear as small blisters or bubbles. After the blisters pop, they leave a round crater and the pinhole can be seen through the transparent film.
There may be several reasons for this:
> Air escapes from the porous substrate and becomes trapped in the coating.
> Temperature / Humidity - If too hot or humid, it can result in rapid drying that cause’s air entrapment in the coating.
> Air movement from fans, door or vents blowing directly on the surface may cause flash drying which causes small bubbles.
> Direct sunlight can cause the product to tack up before necessary air release has occurred, which results in small bubbles and opens up later.
> Mixing at too high of a speedy or for long time, entraps air, resulting in bubbles and opens up later.
> Extreme / aggressive shot blasting opens the pores in the concrete causing air to be trapped when the coating is applied resulting in bubbles and opens up later.
> Roller Covers: Not using the proper nap roller / spike roller recommended will fail to remove the entrapped air which was generated from the process of mixing or chemical reaction.
9. Stains / Tire Marks:
Stains and Marks left behind from vehicles.
> Chemicals or Spills: Resin products take approximately 7 days to fully cure. It is important to allow a minimum of 24 hours for foot traffic and at least 2 full days for forklift traffic or heavy loads or for the use of chemical spill-able areas.
> Tire Marks: Due to the tires being manufactured with plasticizers, which improve cold weather traction, they tend to leach this plasticizer on to the epoxy floors when the tires are warm or hot from driving. This chemical reaction between the tires and epoxy floors are sometimes unavoidable. To help prevent this, consider placing a rubber mat at the location where tires will be on a constant basis.
10. Material Settlement:
Product found settled at the bottom of the container and liquid is floating. This typically happens in pigmented/colored
product, high solid content product. If product is of 2 or more part / component, this happens in resin part but not in hardener part.
Some products settle with time. Settling due to shipping vibration. Product may have expired.
First, check the shelf life of the product. Keep stirring the product while using it. Always stir the products before being mixed together. If settling material is dry and does not mix back into the material, discard it.
11. Not Drying / Slow Drying / Remains talky:
Applied product does not fully cure, or remains soft/tacky 24 hours after application
> Hardener component not used or used in improper mix ratios
> Improper mixing methods
> Cold ambient temperatures
> Material expired
In general,
Cold Ambient Temperatures: This will cause slower than normal drying times. This can cause air bubbles and blisters since the epoxy will remain thick and prevent vapor in the floor from escaping. Make sure the room is brought to suitable temperatures for at least 2 full days prior to application.
Cold Surface Temperatures: Floors that are 55 degrees or lower will greatly affect the drying time of the epoxy. It can also hurt the physical performance properties of the epoxy. A cold surface can also cause adhesion issues with your project. Make sure the floor is at least 60 degrees for a minimum of 2 days prior to application.
12. Wavy flooring:
Finished floor is not level, looks like wavy....
Excessive flow of air in the application area.
Skill of the trowel handling and spike roller worker.
More undulated surface than the applicable thickness of the product.
Stretching material to save the material consumption.
Using of trowel / spike trowel which are not cleaned, dry material not removed.
13. Alligator Cracks:
So many cracks forms like alligator skin texture.
Application of rigid product on smooth / flexible / less rigid surface.
Application of soft primer for rigid product.
14. Brush / trowel / roller marks:
The dried coating / flooring has got brush / trowel / roller marks.
Products applied in too hot site condition or surface condition will reduce the product's workabality and worker will end up the marks.
Improper ventilation systems also affect the finishing works.
Air flow is very aggressive.
Viscosity problem in the product.
Over working with the product.
Application thickness more / less.
Troweled surface shall be rolled with the spike roller to blend the trowel marks.
15. Bulge / crack at joints:
At treated joints, product started bulging and some area it is cracking also.
If applied material bulges up or sinks down or if cracks, it means, the joints is subjected to move and those joints shall be treated as expansion joints.
Hence, cut open the joints and fill it using industrial grade sealant. 16. Straight cracks:
Cracks has emerged in straight line almost from one end of wall to another end.
If the cracks is almost straight and it is almost from one end to another end, means the surface is subjected to movement. Hence, it is necessary to provide the expansion joint to accommodate the expansion and contraction of the substrate.
With all the available details, talk to structural consultant for the depth and width dimension, cut open the groove in the required size and fill the groove with Industrial grade sealant.
17. Failure at columns, wall, joints etc:
Wherever a free edge will occur, for example, around the perimeter of a bay, along channels or expansion joints, at doorways and around the feet of machinery, plinths and columns, anchor grooves must be provided to help distribute mechanical and thermal stresses arising from curing, heavy traffic and temperature changes. This is achieved by forming or cutting an anchoring groove in the concrete, with a depth and width about twice the thickness proposed resin flooring, using a diamond cutting wheel as shown in the below fig.
Many thanks, to the clients who allowed me to take the site images and to google.com from the detail were took.


