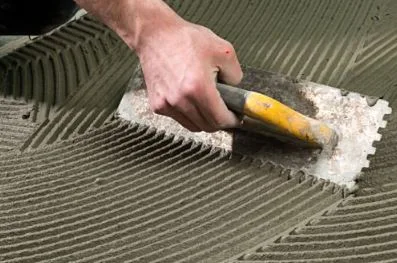
Following the few reasons for affecting the coverage of the Tile
adhesive / Stone adhesive:
1. Mixing method
2. Water / liquid mixing ratio
3. Application method
4. Trowel used for application
5. Back buttering
6. Roughness of the surface
7. Surface regularities / undulations / level
/ plumbness
8. Flatness of the tile / stone
9. Wastage
10. Misinterpretation on manufacturer’s coverage
statement.
Let us discuss these points in
brief:
1. Mixing method: If the adhesive mix is stiff, more will
be the consumption. In the process of mixing, tile layer always takes the
measured water and then adhesive will be added. If tile layer mixes adhesive
manually, he will add more water and less adhesive as he will feel more the
water mixing is easy. But this will not provide the good homogenous mix. So, it
is strongly recommended to us mechanical way of mixing. I.e., use speed
controllable drilling machine fixed with suitable mixing paddle as per
manufacturer’s specification.
2. Water / liquid mixing ratio: If the adhesive mix is
stiff, more will be the consumption. Generally, cement based adhesive powder
is mixed with water and resin-based adhesive’s filler will be mixed with resin
+ hardener. If the water / liquid used for mixing is less, then the adhesive
will be stiff, and consumption will be high. Hence, it is strongly recommended
to follow the manufacturer’s specification.
3. Application method: Some tile layers use to apply adhesive
using normal mason trowel and some by putty blade, only at back side of the
tile/stone. It is wrong. Use steel notch trowel to apply adhesive on the
substrate. In case, if necessary, then only apply adhesive at the back side of
the tile/stone.
4. Trowel
used for application: There are mainly three types of trowel are available.
Square (rectangular) notch trowel, U-Notch trowel and V-Notch trowel.
If the size of
the notches is more, adhesive applied will be more, and when layer presses the
tile/stone, adhesive squeezes out resulting the wastage of adhesive. Hence, use
the proper shape and size of the trowel as recommended by manufacturer.
For more details
on trowel used for adhesive application, refer to: https://annayyachandrashekar.blogspot.com/2017/11/notch-trowel-for-tile-adhesive.html
5. Back buttering: Application of adhesive at back side of the
tile/stone using trowel or using plane trowel is called as Back-Buttering. Un-necessary
back buttering of adhesive will increase the consumption of the adhesive. Seek
the technical advice of the manufacturer before proceeding for execution of
work.
6. Roughness of the surface: if the surface is rough, adhesive
should be applied to it as skim coat using flat trowel to achieve 100% bonding.
Some layers apply adhesive in one go using notch trowel, but it tends to fail because
of bonding issues.


7. Surface regularities / undulations / level / plumbness: Surface
regularity is nothing but a measure of waviness. Undulation are also similar
but at large span. Level is the measure of high / low with respect some fixed
datum and plumbness is the measure the levelness of vertical surface like
plastering or concrete wall or ply wood / metal used as walls. Since, it is
fundamental requirement of the finished surface of tile/stone to be perfect
with “0” Surface regularities / undulations / level / plumbness then all the
falls should be filled with adhesive, then the consumption of adhesive will go
high.
8. Flatness of the tile / stone: Generally, tile flatness is combination
of factors like, tile centre curvature, Edge curvature and Warpage which standards
say shall be ±0.5%. If tile is out of this specification and tile adhesive
is applied uniformly, it results in lippage and to avoid the lippage, tile layer
will apply thicker adhesive and consumes more adhesive. Similarly, if the stone
back side is not flat, this will also need more adhesive to installation.
9. Wastage:
Proper supervision and training shall be provided to tile layer and his
team not to waste the adhesive. Few points are as follows:
a. Mix adhesive as
much as required keeping the pot life as adhesive in mind.
b. Apply adhesive which
can be tile/installed with stone within the open time of the adhesive.
c. Plan the mixing
of adhesive at day end or time near to tea/lunch break.
d. Plan the
installation and double check the tile pattern / size before the installation.
e. Install the level
buttons before the installation.
10. Mis-interpretation on manufacturer’s
coverage statement: Generally, all manufacturer mentions the coverage by applying the adhesive, as mentioend in the TDS using average ampount of water OR perfect quantity of resin and hardner, apply adhesive using mentioned trowel, on flat surface which is having less than +/- 3mm per 3 Mtr length. Keeping this in mind, we all engineers and QC team should work out the quantity of the adhsive.
Many thanks to Google, DOC, engineers.in, Doc69.com from where the details are taken.
Many thanks to Google, DOC, engineers.in, Doc69.com from where the details are taken.


No comments:
Post a Comment