Let see the application part of structural grout. This is non - cementitious grout say epoxy or polystyrene grout. For cementitious grouts, saturate the surface up to SSD.


SHRINKAGE PERFORMANCE
Shrinkage Performance Requirements According to ASTM C1107
As previously mentioned, the ASTM C1107 standard specification covers packaged dry hydraulic cement non-shrink grouts.(1) One of the performance requirements stated in this specification is the allowed volume change that the grouts can undergo. Volume changes are measured in terms of height change of a cylindrical specimen through two other ASTM test methods, ASTM C827 Standard Test Method for Change in Height at Early Ages of Cylindrical Specimens of Cementitious Mixtures and ASTM C1090 Standard Test Method for Measuring Changes in Height of Cylindrical Specimens of Hydraulic-Cement Grout, for early-age (fresh) and hardened height changes, respectively.(39,40) The following sections describe these two test methods.
ASTM C827
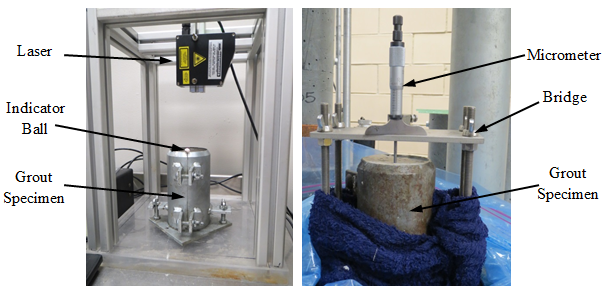
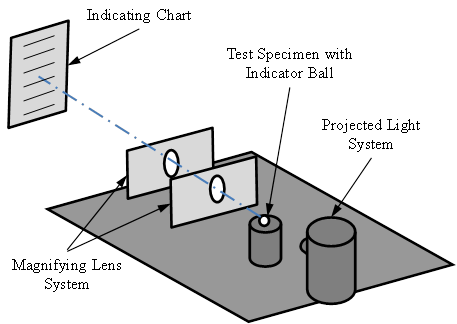
The height change of a 3-inch (76-mm)-diameter by 6-inch (152-mm)-tall cylindrical specimen was measured in accordance with ASTM C827.(39) However, a modification of the ASTM C827 test method was made where a non-contact laser was placed above the specimen and used to measure the vertical distance from the laser to the indicator ball placed on the top surface of the specimen (see figure 12). This approach provided more simplicity in the execution of the test, rather than using a projector lamp, magnifying lens, and indicator charts as described in ASTM C827 (see figure 13). The laser approach has been compared with the original setup, and similar results were obtained.(41) The measured vertical distance corresponds to the increase or decrease in height (expansion or shrinkage) of the material laterally confined in the cylindrical mold from the time of molding to when the mixture becomes hard (i.e., final set).

Figure 12. Photo. Modified ASTM C827 setup (left) and change length in a hardened specimen with ASTM C1090 (right).(39,40)
ASTM C1090
Two cylindrical specimens with the same dimensions as those used for the ASTM C827 test method were prepared in which the change in height was measured at four points on the top surface of the specimens using a micrometer in accordance with ASTM C1090 at 1, 3, 7, 14, and 28 d (see figure 12).(40) An initial four-reading measurement was taken right after placing a glass plate on top of the fresh sample surface. The glass plate was removed from the top of the test specimen after 24 h. After removal, the thickness of the glass plate was measured with a caliper at the points of contact between the glass plate and the micrometer. This thickness was then added to the four-reading initial measurement.

Figure 13. Illustration. The apparatus for early change in height adapted from ASTM C827.(39)
In both test methods, there is always a certain degree of friction between the specimen's sides and the inner surface of the metallic mold. The degree of restraint varies with the mixture viscosity and degree of hardening. Though not recommended by the ASTM standards, and in order to provide the lowest friction possible, an acetate sheet was used in between the test specimen and the mold. The height change results in both test methods are expressed in terms of percentage increase or decrease of the original specimen height.
Details curtsey: https://www.fhwa.dot.gov/publications/research/infrastructure/structures/bridge/16008/003.cfm

Thanks for giving the Innovative information. nice blog Cementitious flooring in pune
ReplyDeleteFabric Shrinkage Testing is a crucial step in the textile industry to understand how much a fabric is likely to shrink when exposed to various conditions such as washing, drying, or other treatments.
ReplyDeleteThank You!!
Interestingly you write, I will address you'll find exciting and interesting things on similar topics. concrete experts
ReplyDeleteDo you know where we can purchase the equipment for the original test to C827? Including the light source?
ReplyDeleteRefer to this video. There are several methods to test the expansion. https://youtu.be/6CZr2NPiFGo?si=RZznm1MDbQOnRM14
ReplyDeleteThis blog provides useful insights into the testing of shrinkage for concrete grout, highlighting an important aspect of ensuring structural stability and performance. The technical focus is valuable for professionals looking to understand material behavior and quality control. To further enhance durability and surface protection in construction projects, working with experienced Epoxy Flooring Contractors in Hyderabad can help achieve long-lasting and high-performance finishes.
ReplyDelete