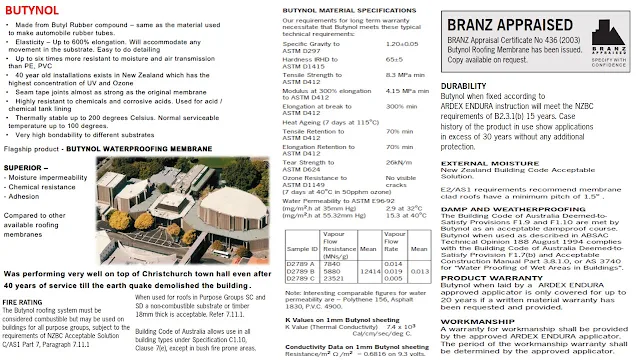
Let see some information available in the market regarding the sheet applied waterproofing membranes:
Let see some installation tips soon.........
How to test the tackiness of contact adhesive:
Comparison between / advantages and disadvantages positive waterproofing system Vs negative waterproofing system:
Let see the detailing of membrane as per ASTM D 5898 – 96: This standard is for bitumen membranes, but shall be adopted for other sheet applied membranes also:
Standard details for adhered sheet waterproofing:
Tunnels and conditions where the width of excavations is limited:
Slab with mud mat (PCC):
Where there is no hydrostatic head below the slab:
Internal and external vertical corners meet horizontal surfaces:
Applicable to an expansion joint in a foundation wall / floor:
Let see the defective installation of sheet applied waterproofing membranes:
How to test the tackiness of contact adhesive:
Brief details of torch on membrane applicaitons:
Brief details of self adhesive membrane application:
Exposed grade ready to install pipe penetrations caps details:
Some of the termination details:
Some of the safe to use mechanical fixtures:
Installation of waterproofing treatment at pile and pile cap
Let see some video instruction for proper detailing of sheet membranes at critical places:
Detailing at pedestal:
Dog leg folding at corners:
Extruded portions:
Extruded corners:
Extruded vertical portions:
Intruded rectangular portion or rain heads:
Pipe penetration extruded:
Pipe penetration intruded:
Complete guidelines for details using Hot Air Weld Gun Video courtesy: TexsaTV
Note:
1. Maintain min 50mm at sheet ends in case of bonded membrane system. Membrane installed free laid or spot bonding or mechanically fixed, maintain the lap of width 75 - 100mm. As per IS 1609, all laps shall be 100mm. So refer the manufacturer's specification.
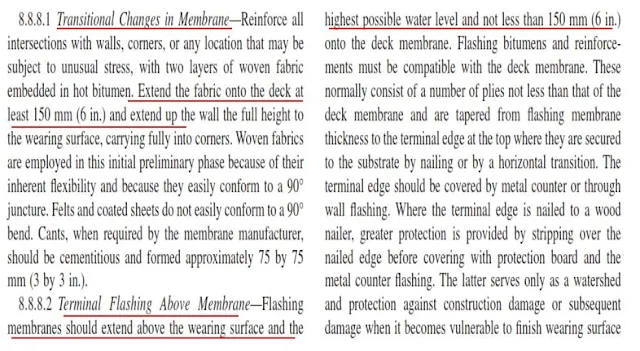
3. Extend floor membrane for min 150mm from the intended limit of the proposed wall at positive side (especial at junction of floor basement and retaining wall). Wall membrane shall be overlapped for min 150mm on floor. Terminal flashing shall be taken to height / depth / width min 150mm.
Refer: ASTM C 981-01: Standard
Guide for
Design of
Built-Up Bituminous Membrane Waterproofing Systems for
Building Decks Page No 8:
5. Avoid cuts and laps at corners.
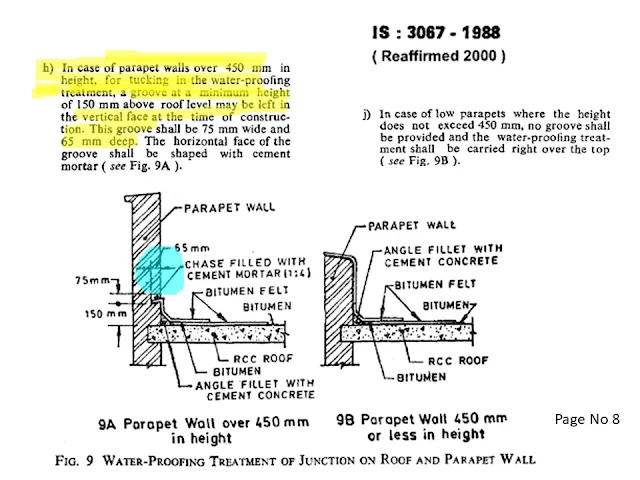
6. Always continue the membrane of the floor on the parapet walls top width if the height of the parapet wall is less than 450mm, if not then terminate it on the wall at height of 150mm - As IS
7. Planters, Bench, and Equipment Supports : Waterproofing membranes on horizontal surfaces should be carried under planters and supports without interruption. Such items should be installed on the concrete protection slab. Waterproofing of planters should be independent of the slab waterproofing.... ASTM D 5898 – 96, Page No 2
8. Waterproofing should not be terminated below grade.
Contd........ with more details....


ReplyDeleteCubicpainting can clean, repair and re-coat your Roof Cleaning at a fraction of the cost of a roof replacement, so you can rest easy knowing that your roof is not only safe and weather proof, but looks fantastic too. A quality roof restoration will extend the life of your roof and is a great alternative if you’re dealing with a leaking roof, broken, cracked or missing tiles, roof rust, roof mould and You can visit our website or can give us call at - 0413 024 499
Our extensive Roof services include
Roof Cleaning & Restoration
Roof Painting
Weatherproof Paint
Waterproofing
Very nice blog and articles. I am realy very happy to visit your blog. Now I am found which I actually want. I check your blog everyday and try to learn something from your blog. Thank you and waiting for your new post. Waterproofing membrane
ReplyDelete